How to Create and Set Up Global Load Balancers Beta
DigitalOcean fully manages Regional Load Balancers and Global Load Balancers, ensuring they are highly available load balancing services. Load balancers distribute traffic to groups of Droplets in specific regions or across different regions, which prevents the health of a backend service from depending on the health of a single server or a single region.
DigitalOcean Global Load Balancers (currently in beta) allow you to distribute traffic to Droplets in different regions for high availability (HA) and performance. Whereas regional load balancers distribute traffic within a single region, global load balancers span multiple regions and route users to your nearest available backend Droplet.
This document guides you through how to create a global load balancer and route a domain to it.
You can enable the global load balancer beta for your team in feature preview.
Create a Global Load Balancer
To create a global load balancer from the DigitalOcean Control Panel, click the Create button and then from the drop-down menu, select the Load Balancers option. Alternatively, on the Load Balancers overview page, click the Create load balancer button.
On the Create Load Balancer page, select the Global option.
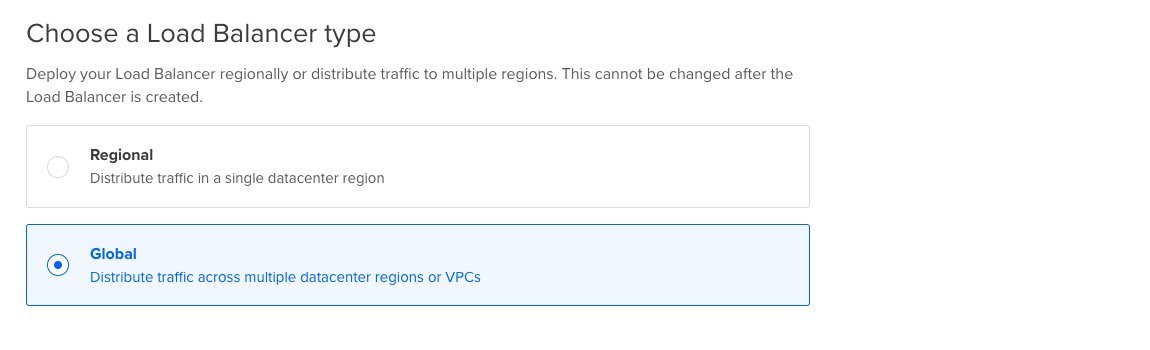
In the CDN Caching section, select whether or not you want to enable caching for your server responses. CDN caching improves performance by caching static assets on edge servers closer to users.
For more information on how to set up your server responses for caching, see CDN Caching.
Connect Droplets
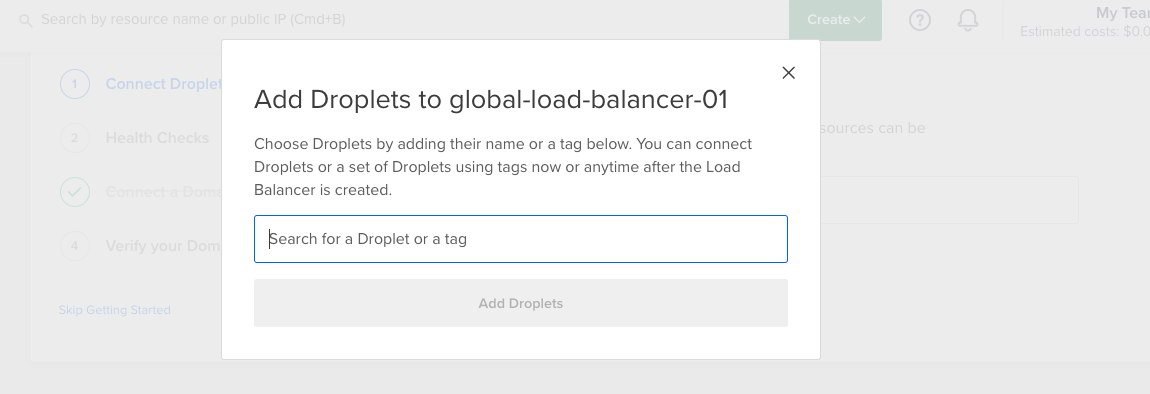
In the Connect Droplets section, use the search bar to add Droplets or groups of tagged Droplets to the load balancer’s backend pool. If you are creating this load balancer for DigitalOcean Kubernetes, you can skip this step. You can add or remove resources from the load balancer’s pool at anytime after creation.
Configure Forwarding Rules
Global load balancers differ from regional load balancers in that they only allow you to configure one forwarding rule. This rule determines which protocol (HTTP, HTTPS, or HTTP2) the load balancer uses to forward traffic to the backend Droplets, and which port (80 or 443) on the Droplets to forward it to.
The default route uses HTTP to send traffic to port 80 on your backend Droplets. You can change these settings as needed.
Configure Advanced Settings
In the Advanced Settings section, you can configure the following settings:
-
Sticky sessions: Sticky sessions send subsequent requests from the same client to the same Droplet by setting a cookie with a configurable name and TTL (Time-To-Live) duration. This is useful for applications that require a persistent connection.
-
Health checks: Health checks monitor the health of your backend Droplets. You can change the thresholds of what is considered an unhealthy Droplet in these settings.
-
SSL: The SSL option forwards HTTP traffic as HTTPS traffic to your backend Droplets. This is useful for applications that do not support HTTPS.
-
HTTP Idle Timeout: The HTTP idle timeout sets the amount of time that a connection can be idle before the load balancer closes it. The default is
60seconds.
You can also modify these settings after you create the load balancer. For more information on load balancer settings, see Modify Advanced Settings.
Finalize and create
In the Finalize and create section, you can choose a name for the load balancer, assign it to a project, and review the total monthly cost for the resource. Ensure load balancer names are unique and contain only alphanumeric characters, dashes, and periods. You can rename load balancers at any time after creation by clicking on the existing name on the load balancer page.
Once you have configured all the necessary options, click the Create Load Balancer button to provision the global load balancer.
Connect a Domain
Once you have created the global load balancer, you can connect a domain to it to begin routing traffic to your backend Droplets. Connecting a domain requires you to set up DNS records that direct traffic to the load balancer’s IP address. If your domain uses HTTPS, you also need to configure SSL/TLS certificates.
This part of the guide provides two different use cases for connecting a domain to a global load balancer:
- Your domain is new DigitalOcean manages its DNS.
- You have an existing website hosted by DigitalOcean but another provider manages the domain’s DNS and you want to migrate your traffic to use the global load balancer.
Connect a Domain that Uses DigitalOcean DNS
If you manage your domain’s DNS with DigitalOcean DNS, you can connect it to by going to the load balancer’s overview page, then clicking the Settings tab, then clicking the Connect a Domain button. In the Getting Started modal, you can also add the domain after creating the load balancer.
On the Connect a Domain screen, enter your domain name into the search field. The field retrieves a list domains from your DigitalOcean account. Locate the domain you want to connect and then select it from the drop-down list.
In the SSL certificate section, select how you want to add SSL/TLS certificates. You can add certificates using two options:
- Generate a new SSL certificate: DigitalOcean generates a new, free SSL certificate for your domain using Let’s Encrypt.
- Use an existing SSL certificate or bring your own: You can select an existing SSL certificate that you have uploaded to DigitalOcean or bring your own SSL certificate by uploading a private key and certificate bundle.
If you use the Bring your own certificate option, you must provide the following information:
- Name: A unique name for the SSL certificate.
- Certificate: The certificate’s public key.
- Private key: The secret key associated with the public key.
- Certificate chain: This is the full trust chain between the trusted certificate authority’s certificate and your domain’s certificate.
Select an SSL certificate option, fill out the additional configuration fields, and then click Connect Domain. This automatically creates the necessary DNS records (two A records and two AAAA records) in DigitalOcean DNS that route traffic from your domain to your load balancer. It may take several minutes to a few hours for the DNS changes to propagate across the internet.
Once you have added your domain and the DNS changes have propagated, you can begin routing traffic to the global load balancer.
Connect a Domain using External DNS
If you manage your domain’s DNS using a third-party provider like Cloudflare or Namecheap, you can still connect your domain to the global load balancer by creating DNS records that direct traffic to the load balancer’s IP addresses.
If your domain is currently managing traffic, this may result in some downtime but you can take steps to minimize the downtime. To migrate traffic to the new load balancer, we recommend setting the TTL (Time To Live) values of your domain’s existing A and AAAA records to the lowest values that your provider allows, then create the new records. This allows existing clients to continue using the old records while new clients get directed to the new load balancer. Once you’ve set up the new records, wait for the TTL expire for the old records and then remove them to complete the migration.
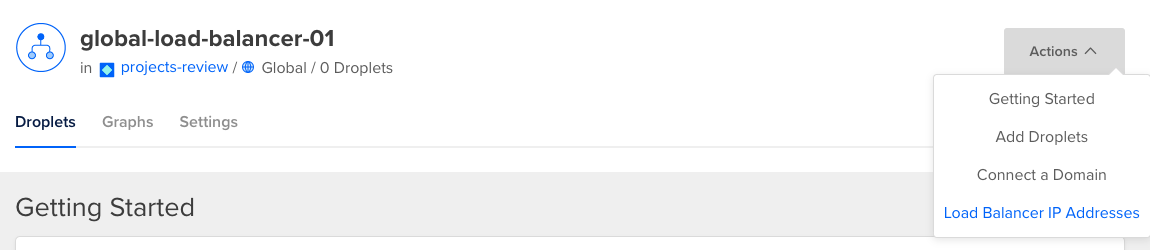
To set up the new DNS records, on the load balancer’s page, click the Actions button, then select Load Balancer IP Addresses. This displays the load balancer’s IP addresses that you need to create the necessary A records and AAAA records at your DNS provider.
At your DNS provider, create a record for each IP address. This should add four new records to your domain: two A records and two AAAA records. See your DNS provider’s documentation to see how this is done.
Once you’ve added the DNS records at your DNS provider, it may take time for the changes to propagate across the internet. You can check that the migration was successful by viewing traffic in the load balancer Graphs tab or testing connectivity to the domain from different locations. To view the load balancer’s traffic statistics from the load balancer’s overview page, click the Graphs tabs.